How To – Composite images in Photoshop for a stunning Milky Way image
Planning for this Milky Way image started a week in advance, I wasn’t sure it would happen until the morning of. The new moon was approaching so I was scouting locations: it was between Hurricane Ridge in the Olympic National Park and Palouse Falls in eastern Washington, both about 4 hours from home, but in opposite directions. Hurricane Ridge was in first place, but a couple days out the weather was cloudy and making me nervous. We woke up Saturday morning still not knowing where we would be going in a few hours. A quick check of the weather made the decision easy, we were heading east of the cascades.

Before and after
With ample time before sunset, it was time to find the photo spot. I had a general idea of where I needed to be and I knew exactly what I wanted the shot to look like. The waterfall fall had to fall on a third line. A clear view down the canyon was needed so that the river provided a nice winding curve. Most importantly, the Milky Way had to fall perfectly into the canyon. The location was set, now we just had 6 hours till sunset and an additional 2 hours till the Galactic Core was visible and in position.
Planning the shoot
To plan this shot I used the Photo Pills app for iOS. Using the app I was able to determine exactly when the Galactic Core would be visible in the sky as well as when the Milky Way would be in line with the canyon. For an introduction to getting started with astrophotography, check out this previous post.
When doing a composite image that will be blended later in post, the key is to shoot from the same perspective. This means that once your tripod is in place, don’t move it! It involves a lot of patience to leave the camera still for hours between the day and night photos, but it’s worth it.
Shooting the foreground
I got into place for the photo about an hour before sunset to ensure that I was exactly where I needed to be and would be set up and ready to shoot at twilight. Being a new moon I knew that there wouldn’t be much natural light and that the canyon would be pitch black so a composite image would most likely be necessary. At 9:12 pm, during twilight, I fired off a series of 5 shots at ISO 100, f/4, 15 sec, that would later be stitched together to make the panorama of the canyon, ensuring a noise-free canyon.
Shooting the Milky Way
I waited until 11:33 pm for the galactic center to be visible and for it to line up with the canyon. Once all the elements were in line, I again fired off a sequence of 5 shots in rapid succession. Settings used were 30 sec, f/4, ISO 6400 with a Nikon 16-35mm f/4 lens.
There were multiple people shooting that night so we were working together to get our shots. One photographer from Hawaii, Don Slocum, had an LED panel that he was using and was kind enough to let me use to get some shots. I wasn’t pleased with the way the shot came out due to the noise in the canyon from being shot at 6400 ISO. To solve this, I used the composite approach instead.

Noncomposite panorama using LED lights
Post Processing
Some people may find post processing a fun part of photography, others may dread it. If you dislike getting your hands dirty in Photoshop then this technique might not be the best approach for you. It can be as time intensive as you want to make it, depending on how much pixel peeping you do and how detailed you want to be.
First things first, in Lightroom, let’s organize the photos to make them easier to work with. Group all the images for the daytime shot into one stack, and all the night photos into another stack.

Image stacks in Lightroom
Next, highlight all the photos in the day stack and right click -> edit in -> merge to panorama in Photoshop. This will fire up Photoshop and open up a panorama dialog with just a few options.

Export to Photoshop
Now, select all the photos in the list, select ‘Auto’ in the layout section if it isn’t already selected, and check ‘Blend Images Together’. Click ‘OK’ and let Photoshop works its magic.

Creating panorama in Photoshop

The initial panorama
Crop the image down to size to get rid of the transparent parts that are produced from image distortion. The bottom of the image doesn’t matter at all since that will be replaced with the daytime image of the canyon. The left and right aren’t super important either, so they are cropped just enough to get rid of the transparency. I want to leave as much of the Milky Way and stars as possible, so I’ll crop as little as possible, leaving transparent areas.
Next, I’ll use content-aware fill to fill in the transparent areas based on the surrounding area. First, select all the layers, right click, select ‘Convert to Smart Object’, then right click ‘Rasterize Layer’. Then select the Magic Wand tool, deselect ‘contiguous’ and click on the transparent area.

Select the Magic Wand tool
Now, go to Edit -> Fill and select ‘Content Aware’. Again, Photoshop will do magical things and fill in the missing image, usually doing a great job for areas that aren’t extremely complex. Now we have our Milky Way layer. Go ahead and save this now.

Content aware fill
Next, repeat the process, but this time using the photos taken during the day. Create the panorama, crop it to size, and do any content filling that may be necessary.
Now comes the more challenging manual part. This is when it becomes important that the photos be taken with the tripod in the same spot. It’s time to composite the images and blend them together. Here’s what we’re working with.

The Milky Way Pano

The canyon pano
Next, both images are brought into Photoshop, each on a separate layer. Neither of them is the height of the what the final image will be once they are combined, so the canvas size needs to be increased. Go to Image -> Canvas Size and double the height for now. You can always go back and increase or decrease it later.
Align the layers
Now it’s time to align the sky and foreground image. Photoshop’s Auto-align layers action usually does a pretty good job of lining up the images, but it typically fails when aligning day and night images. It also doesn’t work in this case where there isn’t much overlap of the images. So, we’ll align them manually.
Use your preferred method of masking out part of the image. In this case, we’ll start off by masking out the sky in the daytime shot so that the Milky Way can shine through. For this, I’ll use the magnetic wand tool. Carefully trace along the horizon of the daytime shot using the wand tool, making sure to not remove important content.
Next, lower the opacity of the top layer, in this case, the canyon shot, to allow the dark canyon in the other image to show through. We do this to make aligning the images easier. Finally, with the canyon layer selected use the free transform tool (⌘T), to resize the canyon image to perfectly match and overlay the background image.
Make the Milky Way pop
A benefit of having separate images for the sky and foreground is that it’s extremely easy to make selective adjustments. Currently, the sky is bland and the Milky Way doesn’t stand out. Let’s make exposure adjustments specifically to the sky to bring out the Milky Way.
First, select the sky layer and go to Filter -> Camera Raw Filter (⇧⌘A). Here we are able to make exposure adjustments to improve the contrast, add a little vibrancy, change the white balance, modify the curves, etc. Remember, the foreground on this layer won’t be seen so we don’t care how the adjustments look on the foreground, we only care about the sky. In addition to the settings shown below, the curves were also adjusted to add additional contrast by creating a slight ‘S curve’

Use Camera Raw Filter to adjust the sky
Dodge and burn
Now that the two images are aligned properly, it looks okay, but it’s still wonky. That’s because it doesn’t look natural from the canyon being shot during the day. It’s way too bright. We need to do some exposure adjustments and burn parts of the canyon for a more realistic and natural feel.
Let’s create a new layer that will be used for ‘dodging’ parts of the image, i.e. selectively making regions darker. A big benefit of using dodge layers rather than painting directly on the image layer is that the changes are nondestructive. This means that brush adjustments aren’t permanently a part of the image layer, enabling you to get back to the original image. Go to Layer -> New -> Layer (⇧⌘N). Change the Mode to Overlay and check the box, Fill with overlay-neutral color.

Create a new dodge layer
Select the Brush tool and change the fill color to black and the brush opacity to somewhere around 20%. Begin painting in the regions that need darkening. I prefer to create different dodge layers for different regions of the image. Doing so makes it easier to undo specific changes if needed. It also makes it very easy to see the changes that you like and dislike. Continue this process of dodging areas that are too bright until the two images look natural.

Multiple dodge layers are handy
That’s it! This is a time-consuming process, but with practice, it will become easier and speed up substantially. As always, if you have any questions or recommendations please leave a comment!

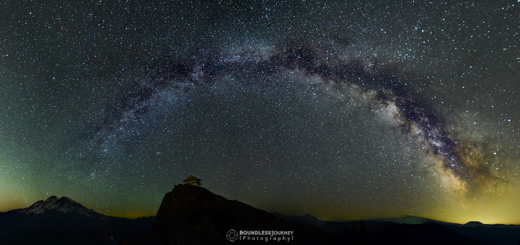
Milky Way over Palouse Falls

Brilliant … trying to get into taking a picture of the stars (without trails), and if possible part of the Milky Way 🙂
I’m glad you liked it! Shooting the Milky Way is a challenge when first getting started, but you’ll learn quickly and it’s a lot of fun! Here’s another post that you might enjoy http://www.boundless-journey.com/2017/08/06/getting-started-with-astrophotography/. Thanks for reading!